

Welcome back to a brand new article about XM Cloud implementations. This time I would like to write about common gated content scenarios and how to achieve those within a typical XM Cloud implementation. The very first port of call is the collection of Accelerate Recipes. If we have a closer look, we find an article talking about Head Application Security. And its exactly what we need. Let’s have a look, how the best practice way could be to have gated content available.

The most important section from this article is the following. And just because it is so important to understand this, I will highlight it once again.
“The standard Sitecore security fields should not be used for this. They are designed for Content Management access only. To achieve this, a new field should be added to your project’s base page template. This can be a simple text field, or a Multilist/Treelist that points at a predefined set of roles matching your authentication provider. You can check this field against your user record in either middleware or server side.”
This means it is not there OOTB. So we need to implement a bit of logic on our own to achieve gated content. Sounds complicated? But it isn’t! This post will guide you step by step through a demo implementation to fully support gated content scenarios including the mechanism to control on a user role level, who is allowed to see a page and who isn’t
The Use Case
Let’s start with a bit of theory in the beginning. Why do we even need a special solution for security / gated content in XM Cloud. As most of you might already know, XM Cloud publishes it’s content to Experience Edge. To access content from there we use some special API Key and GraphQL Queries e.g. via Layout Service. There is currently no built in mechanism of how to secure content within experience edge other than this API Key. As soon as someone has this key, this one can easily grab all the content from Experience Edge. Luckily within the same Accelerate article a bit further down you see some mechanism to prevent leaking that key in the head application.
So far so good. But what about the delivery as soon as you have that key, like the standard head application. As mentioned initially there is no built in security mechanism, also Sitecore Roles are not transmitted to Edge and there is no additional layer of logic within Experience Edge embedded, which might take over this task. So in case you have some “sensitive” data to protect or just want to make sure pages are only delivered to authenticated / authorized user, you need to take over responsibility on your own to do that kind of protection.
Luckily Next.js has a built in mechanism called Middleware. This middleware hooks in into each and every request BEFORE the content is delivered to the user. So the idea is easy. Create such kind of Middleware function, which checks if the requested page is protected or not and if so, if the current user is allowed to see it. If not simply redirect to another page like some login or 401/403 page.
Adaptions in the Sitecore Backend
As mentioned earlier in the article the standard Sitecore Rights & Roles are not transmitted to Experience Edge and therefore cannot be used (and based on Accelerate should not be used for this case!). So the very first part of the custom implementation is very easy. We extend the standard page with a field to let the editor choose specific roles, which have access to the content of the page, based on a given list of roles.

In my very specific case I wanted to differentiate between users, who are anonymous, ones who used the social login, and ones who used the custom user database. In the last one we differentiate between free users and premium users. To protect a page, we simply need to select one or multiple roles on a page. That way only user with one of those roles is allowed to see the page. The provided roles are fully maintainable by an editor as well

Head Application Implementations
Of course, now we need some piece of logic on the other side, which has all the information about the request, the underlying page, the current user and what should be done in every case. The Next.JS Middleware is the ideal place to build the custom logic with.
First of all, where do I place the new Middleware? There is a folder called lib/Middleware. Within this folder we see already some middleware function. That’s the perfect place to add our custom one as well.
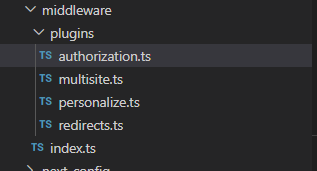
The next question is, how to implement that Middleware function so it fits smoothly in the “ecosystem” of middlwares. To better understand this, we can simply open another middleware function, e.g. the Multisite one

We see that we need to create a class which implemented the MiddlewarePlugin interface. We need to give it a specific order and finally write the actual handler. Sounds easy.

So let’s start with the first parts, to create a class which implements the Middleware Plugin, has a specific order (Decided to let it run as the very last one) and a dedicated exec function. The “hardcoded” error page paths you can ignore for now. Those could be easily managed by XM Cloud as well like the 404 or 500 pages. But let’s keep it a bit simpler of the PoC. Ultimately it is completely up to you and your business logic what kind of error pages you need, where they are located in the content tree or what kind of content they offer. The harder part now is the actual implementation of the business logic. Let’s examine that step by step and case by case.
First we need to grab the underlying page from Experience Edge based on the request path. Together with some existing and implemented helper functions, that one is easy to achieve.

The GetPageItem is just a custom GraphQL Call to grab the page by request path, which returns the new Role fields. No rocket science so far.

The next part is highly depending on the specific Authentication used by the head application. In my case I am using Next-Auth which gives me some server side method to grab the session of the currently logged in user with all the needed data.

Now I am filling some meaningful variables to determine the current situation to see, what I need to do next. The very first case is a case where I check if a user is authenticated and if a page is secured. Depending on the results I return the page or redirect to a dedicated 401 page.
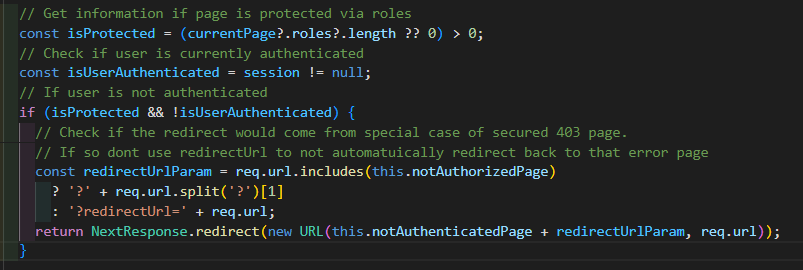
For now ignore the special 403 case, which is a small addon to the later implemented case. This piece of logic just determines if a page is secured at all (Has a role) and if a user is authenticated (Has a session). If a page is secured and user is not logged in, we redirect to a 401 page, which is nothing more than a Sitecore managed content page to inform the user about the fact, that he/she is not logged in and offers a login.
You can also see that some parameter redirectUrl is added. This one ensures, that the original requested resource is not lost in the following redirect and that the user, in case he/she logs in on the 401 page, gets redirected to the originally requested resource. This special logic is implemented on component level in the LoginModule.
Ok, now the next case. What if we are logged in, but our role is not matching with the needed role of the page? In such a case we also need to reject the request and redirect. In my scenario I wanted to split those 403 cases from the previous 401 cases. So I redirect those to another page, which tells the user that he/she is logged in, but is not allowed to see the page. In addition I offer a logout module, which gives the possibility to login with another account with more rights / roles.
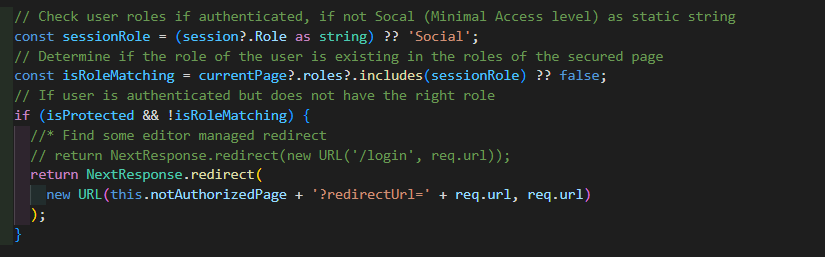
As you can see, earlier we ensured that the user is logged in. Now we ensure that the Role is matching. This one is a 1-n relationship. So a user in my SSO system can only have one role and a page can have n different roles. You can easily extend this logic with some m-n relationship and check if any or all roles are matching, depending on your specific case or business logic. This 1-n relationship was totally sufficient for my PoC. And again you see, that in case we are not authorized, we are doing a special redirect and again with the redirectUrl parameter to not lose the original requested resource.
Up to this point we have a fully working gated content implementation controlled by Sitecore and delivered via head application. But there is one piece of code left, which I thought is nice to have. Imagine the case some authenticated user access the 401 page directly via URL or link. That way the user would get the message that he/she is not logged in and should login. So the following piece of code is an extension to not allow logged in user to access the dedicated 401 page, cause they are logged in and should not see that one then.

This special check ensures that a logged in user cannot see the 401 page, but gets simply redirected to the start page. With that one in mind, you might ask yourself about another special case. What about the 403 page. Shouldn’t this one not also be secured against anonymous access? And from my point of view, that is totally right. But we can use the already implemented role logic from Sitecore to simply secure that page and just allow all roles to access that page. That way no additional code is needed, but the page is secured and can only be visited by logged in user. If an anonymous user would try to access that page, he/she would be redirected automatically to the 401 page to login.
And that’s it! With that Middleware function and our role extension in Sitecore in place we are good to go to see if everything works as expected.
See everything in Action
Because there are quite a few cases to show I will split up the demos accordingly.
Anonymous user accesses standard not-secured pages

This example shows how an anonymous user can browse all the non-secured pages like, home, some news etc. The underlying configuration of those pages looks like this.

As you can see, we simply set no role in the Authorization section under Role. That way we tell the head, that this page is not secured at all.
Anonymous user accesses secured page and causes a 401

In this scenario we start as anonymous user, who tries to access a news page. But now the underlying news is protected as you can see in the screen below.
You can see, that all available roles are allowed. So the only condition is, that the user needs to be authenticated. In case he is not, you can see from the gif that the user is immediately redirected to the 401 page with the request to login. Once the user is logged the redirectUrl parameter is used to redirect the user back to the original resources, which is then available and visible.
Logged in user access a secured page and causes a 403 based on missing role match

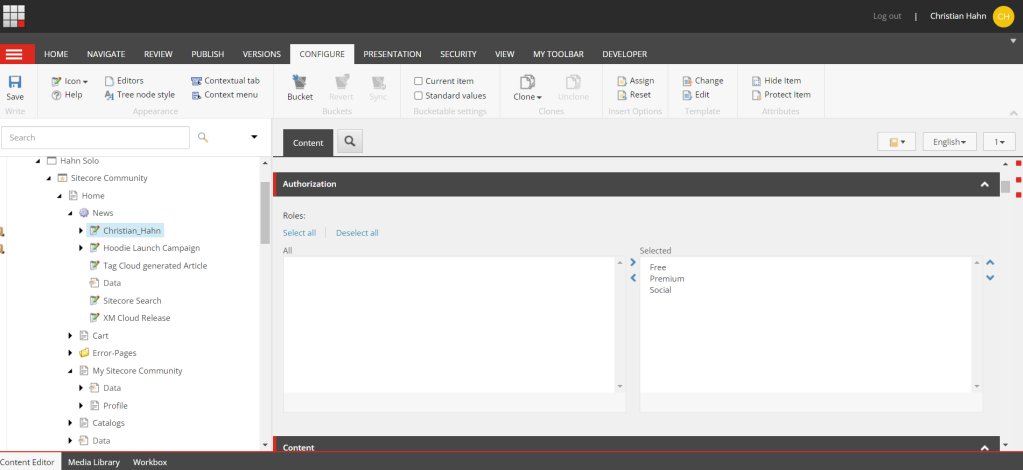
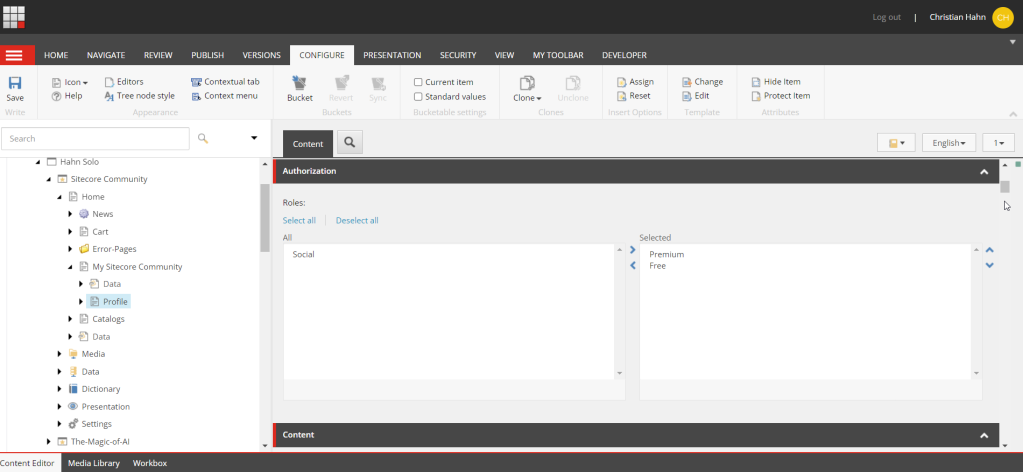
In this scenario we again start as anonymous user, but immediately use the login to authenticate. We are using of one the provided social login options. After we have successfully logged in, we are trying to access the profile page. This attempt ended in a redirect to the 403 page, because even if we are authenticated, we do not have the proper role. From a logical point of view this scenario also makes totally sense, cause by using a social login, we have no possibility to edit out profile, or have any other advanced profile editing capabilities. That way I don’t want all those social login people to enter that page. After we landed on the 403 page we use the logout button to be able to login again. This time we use a “real” account from our own SSO provider, not social login. This account has one of the needed roles. So we are immediately redirected to the original page (Profile) and we can see all of the profile details we know about this user. The following screen shows the configuration in Sitecore, which allows us to have such a behavior.
XM Cloud page management and immediate change in head application
This one should act as proof, that all of the above really works and is fully managed by XM Cloud.

This is the very last case, where I simply demonstrate, that changing the setting on the page in XM Cloud, really has an effect on the head application and is not just some fake or dummy. Note: This is working because I connected my Vercel site to the preview API to avoid the need to publish all the time 😉 That way I see changes much faster. But it is the exact same behavior just without publishing. You can see, that the page initially is not restricted at all, so I am able to see it as anonymous. During the visit I secure the page with any role and save. On the next reload you see, that those changes take place immediately without any delay, so that the anonymous user is automatically redirected to the 401 page to login to see the page again.
Conclusion
During this blog post we saw the challenge of introducing gated content to an XM Cloud implementation. Even though it is not there OOTB yet, we can easily implement the needed logic on our own. As the Accelerate Recipe stated, we simply added some Role field to our page items and on the other side leveraged Next.JS Middleware functionality to extend those with a custom Authorization middleware. This one holds all the specific business logic to examine the page behind the URL and even more important to decide if the access should be granted or rejected. In my implementation I played around with dedicated 401 and 403 pages and some cleverly used redirects on middleware level to let the user specifically know, what is happening and what he/she can do now. Everything at all this whole PoC implementation took be just a few hours from the idea to a working piece of implementation.


